A schlanke Lithium-Batterie Das Muster ist nicht nur ein einfaches Batterie-Muster. Für eine 4×4-Marke, einen Hersteller von Verdeckkonstruktionen, einen Ausstatter für Pick-ups oder einen Händler für Offroad-Zubehör ist es ein erster Test für Produktqualität, Erfahrung der Monteure, Garantierisiko und Markenruf.
Viele OEM-Projekte scheitern nicht daran, dass die Batterie im Prüfstand keine Energie liefern kann, sondern daran, dass das Muster nicht unter realen 4×4-Bedingungen getestet wurde: Einbau in den Ladekasten, Zugang zu den Anschlüssen, Aktivierung des BMS, Stabilität des DC-DC-Ladegeräts, Kennzeichnung für den Einbauer und Exportverpackung.
Diese Checkliste hilft 4×4-Marken dabei, vor der Massenproduktion unter Eigenmarke die Passgenauigkeit, die Kapazität, den BMS-Schutz, die Kompatibilität mit Ladegeräten, die Verkabelung, die Kennzeichnung, die Verpackung und die Dokumentation zu prüfen.
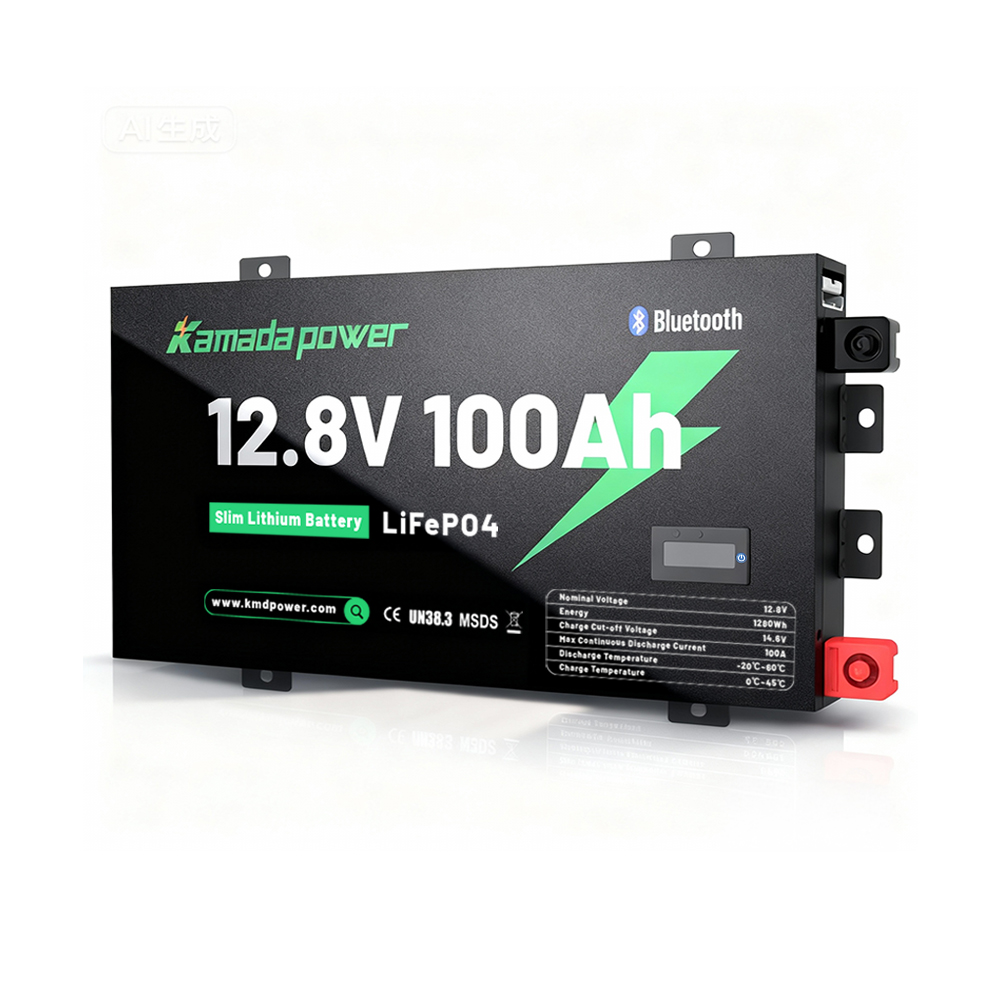
Kamada Power 12 V, 100 Ah, Slimline-Lithium-Akku
Warum für Proben von Slimline-Lithium-Batterien ein anderes Prüfverfahren erforderlich ist
Eine handelsübliche 12-V-LiFePO4-Batterie wird häufig als Stromversorgungsprodukt getestet. Eine schlanke Lithium-Batterie für 4×4-Anwendungen müssen als Teil des Fahrzeugantriebssystems geprüft werden.
Die Batterie kann hinter einem Rücksitz, unter einem Sitz, in einem Verdeck, neben einem Schubladensystem oder in einem Aufbauteil eingebaut werden. Diese Räume sind eng, heiß, staubig und nach dem Einbau schwer zugänglich.
Für OEM-Einkäufer muss das Muster die Passgenauigkeit, die Systemkompatibilität und die Wiederholbarkeit in der Serienfertigung nachweisen.
Schritt 1: Definieren Sie die Anwendung vor dem Testen
Beginnen Sie nicht mit der Batterie. Beginnen Sie mit dem Anwendungsfall. Bevor das Muster eintrifft, klären Sie das Zielfahrzeug, den Einbauort, die Lastliste, das Ladegerätemodell, die Solareinspeisung, die Befestigungsart, den Zielmarkt sowie die Kriterien für „bestanden“ und „nicht bestanden“.
Ein guter Test sollte praktische Fragen klären: Passt die Batterie mit ausreichendem Kabelabstand in den Einbaurahmen? Kann das DC-DC-Ladegerät sie ohne Fehlermeldungen aufladen? Kann sich das BMS nach einer Abschaltung wiederherstellen? Haben Installateure Zugang zur Sicherung, zur Klemme, zum Etikett und zu den Wartungspunkten?
Ohne klare Kriterien wird die Freigabe von Proben zu einer subjektiven Angelegenheit.
Schritt 2: Dokumente vor dem Prüfstandstest überprüfen
Ein gutes Muster sollte nicht nur in einem Karton, sondern zusammen mit einer vollständigen Dokumentationsunterlage geliefert werden. Fordern Sie das Datenblatt, die Bedienungsanleitung, den Schaltplan, die UN38.3-Prüfzusammenfassung, das Sicherheitsdatenblatt (SDS oder MSDS), Transportinformationen, einen Entwurf des Produktetiketts, das Format der Seriennummer, die Garantiebedingungen, eine Übersicht über die BMS-Schutzeinstellungen sowie die Verpackungsspezifikation an. UN38.3 dient der Einstufung für den Transport von Lithium-Batterien; sie sollte nicht als vollständige Zulassung für die Produktsicherheit oder den Einbau in Fahrzeuge dargestellt werden.
Vergleichen Sie das Datenblatt mit dem Etikett und dem tatsächlichen Muster. Nennspannung, Ah, Wh, Ladespannung, maximaler Ladestrom, Dauerentladestrom, Spitzenentladestrom, Temperaturbereich, Abmessungen, Anschlussart sowie die Grenzwerte für Reihen- und Parallelschaltung sollten übereinstimmen.
Wenn das Muster zwar elektrisch funktioniert, die Unterlagen jedoch lückenhaft sind, ist es noch nicht bereit für die OEM-Zulassung.
UN38.3-Grenzwert: Das UN-Handbuch für Prüfungen und Kriterien stützt sich bei der Einstufung für den Transport von Lithium-Batterien auf Unterabschnitt 38.3. Die Zusammenfassung der Prüfungen ist ein wichtiger Nachweis für den Transport, ersetzt jedoch nicht die anwendungsspezifische Bewertung hinsichtlich Produktsicherheit, Fahrzeugumgebung, EMV, Einbau oder Zielmarkt.
Schritt 3: Checkliste für den mechanischen Einbau
Die Passgenauigkeit ist einer der häufigsten Fehlerquellen bei OEM-Projekten mit Slimline-Batterien. Messen Sie das tatsächliche Muster und verlassen Sie sich nicht nur auf das Datenblatt. Überprüfen Sie Länge, Breite, Höhe, Anschlusshöhe, Freiraum für den Griff, Position des Etiketts, Befestigungsfläche, Kontaktfläche der Halterung, Biegungsraum für Kabel, Zugang zum Sicherungshalter sowie gegebenenfalls den Zugang zur Bluetooth- oder Reset-Taste.
Eine schlanke Batterie passt zwar auf dem Papier in den Einbauraum, lässt sich aber dennoch nur schwer einbauen, wenn der Anschluss zu nah an einer Wand liegt, sich die Kabelschuhe nicht sicher drehen lassen oder der Monteur nach dem Einbau der Batterie nicht mehr an die Sicherung herankommt.
Überprüfen Sie außerdem die Befestigungsstabilität. Eine 4×4-Batterie muss Vibrationen, Bremsvorgänge, Unebenheiten und Bewegungen im Gelände standhalten. Vermeiden Sie Konstruktionen, bei denen der Gurt auf empfindliche Kunststoffbereiche, Etiketten, Anschlussabdeckungen oder scharfe Kanten drückt.
Erstellen Sie während der Musterprüfung eine fotografische Dokumentation der Installation: Akku im Fach, Kabel angeschlossen, Sicherung eingesetzt und Wartungszugang überprüft.
Schritt 4: Erste elektrische Überprüfung
Erfassen Sie vor der vollständigen Prüfung den Zustand des Testobjekts bei dessen Ankunft: Leerlaufspannung, geschätzter Ladezustand (SOC), Gewicht, Zustand der Anschlüsse, Zustand des Gehäuses, Zustand der Etiketten, App- oder Bluetooth-Verbindung, BMS-Status, Alarme, Fehlercodes und auffällige Messwerte.
Sollten die Daten zu Spannung, Gehäuse, Anschluss oder Anwendung auffällig erscheinen, unterbrechen Sie den Vorgang und klären Sie die Situation mit dem Lieferanten ab, bevor Sie fortfahren.
Überprüfen Sie außerdem die Lademethode. Halten Sie sich an die vom Hersteller empfohlenen Spannungs- und Stromwerte. Falls in Ihrem Markt bestimmte DC-DC-Ladegeräte üblicherweise verwendet werden, bereiten Sie diese Ladegeräte für Kompatibilitätstests vor, anstatt sich ausschließlich auf ein Laborstromnetzteil zu verlassen.
Schritt 5: Kapazitäts- und Laufzeitprüfung
Leistungsprüfungen sind notwendig, doch sind die Ergebnisse nur dann vergleichbar, wenn das Protokoll kontrolliert wird. Legen Sie die Methode fest, bevor die Probe eintrifft.
| Testbedingung | Was ist zu definieren? |
|---|
| Umgebungs- und Zellstarttemperatur | Solltemperatur und zulässige Toleranz |
| Vorbehandlung | Anzahl der vollständigen Zyklen (falls vorhanden) vor dem aufgezeichneten Test |
| Lademethode | Spannung, Strombegrenzung, Absorptions- oder CV-Abschlussstrom sowie Genauigkeit des Ladegeräts |
| Ruhezeit nach dem Laden | Festgelegte Zeit bis zum Beginn der Entladung |
| Entladungsrate | Vereinbarter Konstantstrom oder vereinbarte Konstante Leistung, wie beispielsweise eine festgelegte C-Rate oder eine realistische Projektlast |
| Ausschaltbedingung | Pack-Spannung, Zellspannung, BMS-Abschaltwert oder vom Lieferanten festgelegter Endpunkt |
| Instrumentierung | Genauigkeit von Spannung, Strom, Temperatur, Ah und Wh sowie Kalibrierungsstatus |
| Erfasste Daten | Ah, Wh, Spannungskurve, Laufzeit, Temperatur, Abschalt- und Erholungsverhalten |
| Wiederholung | Anzahl der Tests und zulässige Ergebnisabweichung |
| Abnahmetoleranz | Mindestwerte für Ah und Wh im Verhältnis zum vereinbarten Nennwert und zum Prüfverfahren |
Verwenden Sie sowohl Ah als auch Wh. Ah allein kann eine niedrigere durchschnittliche Entladungsspannung verschleiern, während Wh die abgegebene Energie angibt. Verwechseln Sie nicht ein Labor-Kapazitätsergebnis bei niedriger Entladungsrate mit einer Angabe zur Laufzeit unter hoher Belastung im Praxiseinsatz.
Für den Einsatz in Allradfahrzeugen sollten nach dem standardisierten Kapazitätstest realistische Stromtests durchgeführt werden. Eine Batterie, die ausschließlich für den Kühlschrank genutzt wird, wird meist mit geringen Strömen betrieben; ein Wechselrichter, eine Pumpe, ein Kompressor, die Beleuchtung und das Aufladen von Werkzeugen können jedoch höhere Dauerlasten und kurze Stromspitzen verursachen.
Geben Sie eine Probe nicht als konform frei, nur weil sie unter idealen Bedingungen einmal den Grenzwert erreicht hat. Wiederholbarkeit, Temperatur, Messgenauigkeit des Geräts und die vereinbarte Toleranz spielen allesamt eine Rolle.
Schritt 6: Dauerentladungs- und Stoßlasttest
Eine 4×4-Zusatzbatterie versorgt nicht nur Dauerströme mit Strom. Sie muss unter Umständen auch das Anlaufen von Kompressoren, den Pumpenbetrieb, das Hochfahren von Wechselrichtern, das Aufladen von Werkzeugen oder mehrere Verbraucher gleichzeitig bewältigen.
Prüfung der Dauerentladung bei Nennstrom, der Temperatur an den Anschlüssen und am Kabel, des Spannungsabfalls unter Last, der Stabilität des BMS während der Dauerentladung, des Verhaltens bei Kurzzeitüberlast, der Erholung nach Auslösung des Überlastschutzes sowie der Sichtbarkeit von Alarmen über Bluetooth oder das Display, sofern vorhanden.
Das Ziel besteht nicht darin, den Akku zu überbeanspruchen, sondern zu überprüfen, ob das Testmuster die Lasten aushält, die Ihre Kunden tatsächlich anschließen werden. Führen Sie keine unsicheren, zerstörenden Tests durch, wie z. B. Kurzschluss-, Überlade-, Durchstoß-, Quetsch- oder thermische Belastungstests, es sei denn, diese werden von qualifizierten Labors unter kontrollierten Standardbedingungen durchgeführt.
Schritt 7: Checkliste für den Schutz und die Wiederherstellung des BMS
Das BMS legt fest, wie sich die Batterie verhält, wenn ein Fehler auftritt. Prüfen Sie, ob das BMS Schutz vor Überladung, Überentladung, Überstrom, Kurzschluss, Überhitzung, Laden bei niedrigen Temperaturen, Zellungleichgewicht und dem Risiko einer Verpolung bietet, sofern dies durch die Konstruktion unterstützt wird.
Schutz allein reicht nicht aus. Überprüfen Sie auch die Wiederherstellungsfunktionen: automatische Wiederherstellung, Aktivierung durch das Ladegerät, Neustart bei niedriger Spannung, App-Alarme, Installationsdiagnose und manuelle Anweisungen. Ein unklares Verhalten bei der Wiederherstellung führt zu Druck im Kundendienst, da ein inaktiviertes BMS wie eine leere Batterie wirken kann.
Schritt 8: Schutz vor Laden bei niedrigen Temperaturen
Das Laden bei niedrigen Temperaturen ist für Lithium-Akkus von entscheidender Bedeutung, die bei Wintertouren, in alpinen Gebieten, in Nordeuropa, Kanada, den nördlichen US-Bundesstaaten und in kalten Wüstennächten zum Einsatz kommen.
Ein Testgerät sollte nicht nur einen Schutz vor dem Laden bei niedrigen Temperaturen versprechen. Überprüfen Sie, bei welcher Temperatur das Laden blockiert wird, wann das Laden wieder möglich ist, ob das Entladen weiterhin zulässig ist, ob das Ladegerät wiederholt Ladezyklen durchläuft, ob die App oder das Display eine deutliche Warnung anzeigt und ob in der Bedienungsanleitung die Grenzen für das Laden bei niedrigen Temperaturen erläutert werden.
Bei Eigenmarkenprodukten handelt es sich hierbei um ein Markenrisiko. Schutzmaßnahmen, Etiketten und Anweisungen müssen aufeinander abgestimmt sein.
Schritt 9: Kompatibilitätstest für DC-DC-Ladegerät und Solaranlage
Viele 4×4-Antriebssysteme nutzen DC-DC-Ladegeräte, intelligente Lichtmaschinen, Solareinspeisung, Anderson-Stecker und Batteriemonitore. Ein Prototyp, der auf einem Labor-Ladegerät gut funktioniert, kann im realen Fahrzeug dennoch Probleme bereiten.
Testen Sie das Muster mit Ladegerätemodellen, die Ihre Kunden tatsächlich verwenden, wie beispielsweise REDARC, Victron, Projecta, Enerdrive, Renogy, CTEK oder andere lokale Marken.
| Testaufgabe | Was ist zu prüfen? |
|---|
| Gesamtspannung | Innerhalb der Akkuladegrenze |
| Absorption | Stabil, keine auffälligen Grenzwerte |
| Ausgleichen | Keine wiederholten BMS-Zyklen |
| Ladestrom | Innerhalb des empfohlenen Strombereichs |
| Solare Einstrahlung | Stabil bei wechselnder Sonneneinstrahlung |
| Weckfunktion bei niedrigem Ladezustand | Das Ladegerät kann das BMS bei Bedarf aktivieren |
| Voll aufgeladen | Kein Überspannungsalarm oder Ladegerätfehler |
Falls Ihre Marke komplette Stromversorgungssysteme für Überdachungen verkauft, testen Sie die Batterie zusammen mit dem gesamten System: DC-DC-Ladegerät, Solarregler, Shunt, Sicherungskasten, Schalttafel, Wechselrichter und übliche Verbraucher.
Schritt 10: Checkliste für Verkabelung, Sicherung und Erdung
Viele Beschwerden über Batterien sind nicht auf die Batterie selbst zurückzuführen, sondern auf mangelhafte Verkabelung, falsche Sicherungsauswahl, Spannungsabfall, unzureichende Erdung oder fehlerhafte Installation des Shunts.
Überprüfen Sie den empfohlenen Kabelquerschnitt anhand der Stromstärke und der Leitungslänge, der Nennleistung und des Typs der Sicherung sowie deren Position, des Schutzes des Pluspols der Hauptbatterie, des Minuspolanschlusses der Batterie, der Anforderungen an die Fahrgestellerdung, der Position des Shunts, ob eine Last den Shunt umgeht, ob der Batteriemonitor korrekte Werte anzeigt und ob die Kabelschuhe sicher auf die Klemmen passen.
Das Muster sollte die Installateure nicht zum Raten zwingen. Bitten Sie den Lieferanten, Ihnen bei der Erstellung eines übersichtlichen Schaltplans zu helfen, der die Batterie, das DC-DC-Ladegerät, den Solareingang, die Sicherung, den Shunt, den Sicherungskasten, den Wechselrichter und die Hauptlasten zeigt.
Schritt 11: Praxistest unter realen 4×4-Bedingungen
Prüfstandstests finden unter kontrollierten Bedingungen statt; Feldtests decken Integrationsprobleme auf. Ein aussagekräftiger Feldtest kann folgende Faktoren umfassen: tägliches Fahren, nächtliche Kühlschranklast, Solarladung, Kompressorstart, Wasserpumpenzyklen, LED-Beleuchtung, Aufladen von Werkzeugen, Fahrt auf unebenen Straßen, Einwirkung heißer Motorhauben, Staub sowie wiederholte Lade- und Entladezyklen.
Erfassen Sie die Laufzeit, die Spannungskurve, den Ladezustand (SOC), das Ladegerätverhalten, Alarme, die Temperatur, die Erholung nach einer Abschaltung, den Zustand der Steckverbinder, Bewegungen der Halterung, Rückmeldungen des Installateurs sowie Kommentare der Endnutzer.
Ein Feldtest ist kein Ersatz für formelle Schwingungs-, Stoß-, Eindring-, Temperatur-, EMV- oder Sicherheitstests, sofern diese vorgeschrieben sind. Wählen Sie geeignete Labornormen aus der jeweiligen Produktkategorie, dem Einbauort, dem Zielmarkt, den Kundenspezifikationen und der Risikobewertung aus – beispielsweise relevante Prüfverfahren für die Fahrzeugumgebung oder allgemeine Umweltprüfverfahren. Behaupten Sie nicht, dass ein einziger allgemeiner Fahrversuch oder eine einzige Norm für jede 4×4-Einbauvariante gilt.
Schritt 12: Überprüfung des OEM-Brandings, der Bedienungsanleitung und der Verpackung
Bei einer Eigenmarken-Batterie beginnt das Markenerlebnis bereits mit dem Muster. Überprüfen Sie die Größe und Position des Logos, das Material und die Haftfestigkeit des Etiketts, den Barcode oder QR-Code, die Seriennummer und das Herstellungsdatum, die Modellnummer, die Sicherheitshinweise, die Nennspannung, Ah, Wh, die Lade- und Entladegrenzen, die Temperaturwarnungen, gegebenenfalls die Zertifizierungszeichen sowie die korrekte Schreibweise und die Einheitendarstellung.
Das Handbuch sollte eine Produktspezifikation, einen Schaltplan, Hinweise zum DC-DC-Ladegerät, Hinweise zu Sicherungen und Kabeln, Hinweise zum Solarladen, eine Warnung bei niedrigen Temperaturen, Lagerungshinweise, eine Anleitung zur Fehlerbehebung, Informationen zum Garantieumfang sowie Kontaktdaten enthalten.
Auch die Verpackung ist Teil der Stichprobenprüfung. Überprüfen Sie den Schaumstoff im Inneren, die Festigkeit des Kartons, den Schutz der Anschlüsse, den Beutel mit dem Zubehör, die Position der Bedienungsanleitung, das Etikett auf dem Umkarton, die Palettenverpackung sowie gegebenenfalls die Anforderungen für die Präsentation im Einzelhandel und den Versand im E-Commerce.
Schritt 13: Definieren Sie das Golden Sample
Sobald das Muster die Prüfung bestanden hat, sollten Sie nicht ohne vorherige Kontrolle direkt zur Serienfertigung übergehen. Erstellen Sie ein „Golden Sample“-Protokoll, das die endgültigen Abmessungen, das Gehäusedesign, die Position der Anschlüsse, das Etikettendesign, die BMS-Einstellungen, die Handbuchversion, das Verpackungsdesign, das Zubehör und das Format des Prüfberichts umfasst.
Legen Sie außerdem fest, was ohne Zustimmung des Käufers nicht geändert werden darf, wie beispielsweise Zellklasse, BMS-Modell, Firmware, Gehäuseform, Anschlussanordnung, Lade-/Entladegrenzen, Niedrigtemperaturschutz, Etiketteninhalt und Verpackungsart. Ein Referenzmuster verhindert Abweichungen in der Produktion.
Beispiel für eine Tabelle mit Testbewertungen (bestanden/nicht bestanden)
| Testkategorie | Bedingung für das Bestehen | Fehlerwarnung |
|---|
| Abmessungen | Entspricht der genehmigten Zeichnung, den Toleranzen und dem Einbauraum | Störungen durch Einschub, Anschluss, Kabel oder beim Ausbau |
| Kapazität | Erfüllt die im schriftlichen Prüfprotokoll vereinbarten Ah- und Wh-Toleranzen | Das Ergebnis hängt von einer undefinierten Methode ab oder liegt außerhalb der Toleranzgrenze. |
| BMS | Die Schutzschwellenwerte und die Wiederherstellung entsprechen der genehmigten Spezifikation | Die Fehlerbehebung ist unklar oder uneinheitlich |
| Niedertemperaturladung | Der Ladevorgang wird bei der vereinbarten Zelltemperatur begrenzt oder unterbrochen und läuft anschließend wieder ordnungsgemäß ab | Unsicheres Laden, wiederholte Ladezyklen oder unklare Warnhinweise |
| DC-DC und Solar | Stabiler Betrieb mit benannten Ladegeräten bei niedrigem Ladezustand (SOC) und im Normalbetrieb | Zyklische Ausfälle, Fehlschläge beim Hochfahren, Überspannung oder thermische Leistungsminderung außerhalb der vereinbarten Grenzen |
| Verkabelung | Kabel, Schutzmaßnahmen, Ableitung und Erdungsmethode sind dokumentiert | Der Installateur muss raten, oder ein Leiter ist unzureichend geschützt |
| Mechanisch | Die Befestigung und die Anschlüsse bleiben im Rahmen der vereinbarten Validierung sicher | Bewegung, Beschädigung, lockere Verbindung oder unzugängliche Wartungspunkte |
| Kennzeichnung | Langlebig, präzise und auf Modell und Charge rückverfolgbar | Fehlende Warnhinweise, Bewertung, Überarbeitungs- oder Seriennummer |
| Verpackung | Erfüllt die vereinbarten Anforderungen an die Handhabung oder den Versand | Endgültige Exposition, unzureichende Sicherung oder wiederholte Beschädigung |
| Dokumente | Das Datenblatt des genauen Modells, die Bedienungsanleitung, der Transportnachweis und die erforderlichen Marktunterlagen stimmen überein | Dokumente mit ähnlichem Layout, fehlende Überarbeitungen oder nicht unterstützte Markierungen |
Häufige Fehler, die 4×4-Marken begehen
Zu den häufigsten Fehlern zählen das Testen ausschließlich der Kapazität, die Verwendung eines generischen Tischladegeräts, das Ignorieren des Feedbacks des Installateurs sowie die Freigabe des Musters, ohne die BMS-Einstellungen, die Zellenauswahl, die Firmware, die Etiketten und die Verpackung festzulegen.
Wann Sie das Muster nicht genehmigen sollten
Geben Sie das Muster nicht frei, wenn die tatsächlichen Abmessungen nicht mit der Zeichnung übereinstimmen, die Batterie nicht in die vorgesehene Halterung passt, die Kabelführung unsicher ist, das Abschalt- und Wiederherstellungsverhalten des BMS unklar ist, die Kompatibilität des DC-DC-Ladegeräts instabil ist, das Ladegerät das BMS nicht aktivieren kann, der Schutz vor Laden bei niedrigen Temperaturen nicht überprüft werden kann, die Kapazität unter dem vereinbarten Standard liegt, das Etikett nicht rückverfolgbar ist, die Dokumentation unvollständig ist, die Verpackung zu schwach ist oder der Lieferant das freigegebene Design für die Produktion nicht festlegen kann.
Ein fehlerhaftes Muster bedeutet nicht zwangsläufig, dass der Lieferant versagt hat. Viele Muster erfordern ein oder zwei technische Überarbeitungen. Entscheidend ist, ob der Lieferant das Problem erklären, beheben, die Änderung dokumentieren und ein überarbeitetes Muster vorlegen kann, das den vereinbarten Anforderungen entspricht.
Was Sie Ihrem Lieferanten vor der Anforderung eines Musters zukommen lassen sollten
Um ein aussagekräftiges Muster zu erhalten, senden Sie uns bitte die Zielfahrzeugmodelle, Fotos der Einbaustelle, die maximale Batteriegröße, die erforderliche Spannung und die erforderliche Kapazität in Ah, eine Liste der erwarteten Lasten, den Spitzenstrombedarf, Marke und Modell des DC-DC-Ladegeräts, die Anforderungen an die Solareingangsleistung, die Größe des Wechselrichters (falls verwendet), die bevorzugte Anschlussart, die Befestigungsart, den Zielmarkt, die Logodatei, die Anforderungen an die Etikettierung, die Verpackungsanforderungen, die Zertifizierungsanforderungen sowie das geschätzte Jahresvolumen.
Wenn du nur nach „einem“ fragst, schlanke 12-V-Lithium-Batterie“, kann es vorkommen, dass die Fabrik ein technisch einwandfreies Muster liefert, das jedoch nicht zu Ihrem tatsächlichen Markt passt.
Schlussfolgerung
A schlanke Lithium-Batterie Ein OEM-Muster sollte mehr als nur die Kapazität unter Beweis stellen. Bei 4×4-Marken muss es die mechanische Passgenauigkeit, die elektrische Stabilität, den BMS-Schutz, die Kompatibilität mit DC-DC-Ladegeräten, die Übersichtlichkeit der Verkabelung, die Benutzerfreundlichkeit für den Einbauer, die Vollständigkeit der Dokumentation, die Festigkeit der Verpackung sowie die Wiederholbarkeit in der Produktion nachweisen.
Bevor Sie die Serienproduktion genehmigen, testen Sie das Muster als Teil eines echten 4×4-Antriebssystems und nicht nur als Batterie auf einem Prüfstand. Überprüfen Sie den Einbauraum im Fahrzeug, das Ladegerätemodell, das Lastprofil, den Sicherungs- und Kabelplan, das Etikettendesign sowie die Verpackung, bevor Sie das endgültige Muster freigeben.
Wenn Sie eine Slimline-Lithium-Akku als Eigenmarkenprodukt Für den Einsatz in Geländewagen, Pick-ups, Fahrzeugen mit Schutzdach, Overland-Fahrzeugen, Tourenfahrzeugen oder Nutzfahrzeugen teilen Sie uns bitte die Abmessungen des vorgesehenen Batterieraums, das Ladegerätemodell, das Lastprofil, die Einbaulage, die Anforderungen an die Markenkennzeichnung sowie die voraussichtliche Bestellmenge mit. Kontakt Wir können Ihnen dabei helfen, die Testpunkte der Muster vor Beginn der Serienfertigung zu überprüfen.
FAQ
Was sollte ein 4×4-Hersteller als Erstes an einem OEM-Muster einer Slimline-Lithiumbatterie testen?
Beginnen Sie mit der Dokumentation, den tatsächlichen Abmessungen, der Anschlussbelegung, der Eingangsspannung, der Kapazität, dem BMS-Schutz, der Kompatibilität mit DC-DC-Ladegeräten, den Anforderungen an die Sicherungen und der Montage durch den Installateur.
Reicht ein Kapazitätstest aus, bevor die Serienproduktion genehmigt wird?
Nein. Die Kapazität sagt nur etwas über einen Teil der Akkuleistung aus. Ein 4×4-OEM-Muster muss außerdem Prüfungen hinsichtlich Einbau, BMS-Wiederherstellung, Ladegerätekompatibilität, Schutz vor Laden bei niedrigen Temperaturen, Kennzeichnung, Verpackung und Dokumentation bestehen.
Sollte ich das Muster mit meinem eigentlichen DC-DC-Ladegerät testen?
Ja. Verwenden Sie die Ladegerätemodelle, die Ihre Kunden und Installateure üblicherweise einsetzen. Viele Probleme vor Ort sind auf eine nicht passende Ladegerätkonfiguration, einen Fehler beim Aufwachen bei niedrigem Ladezustand (SOC), Spannungsabfall, die Wahl der Sicherung oder Erdungsprobleme zurückzuführen.